Setup Environment
Task.dev CLI
This is a replacement for make, it provides a much simpler syntax and is well documented.
You can read the task.dev documentation here
OSX
Snap
NPM
Go Install
Info
You can run task on your command line to view a list of available tasks and their descriptions.
Initial Setup Task
Once task is installed run
This will create a .env file in the root of the project, install the tilt cli and install the K3D cli.
Info
Please see the Environment File section below for information about setting up your .env file correctly.
Note
Tilt is not used by this project but is used by applications that use this toolkit for development.
Host Names
In order to make ingress work you will need to add some records to your hosts file, we will be adding two entries. One is for talking to the ingress and the other is for hosting local docker images.
Start by editing your host file typically found at /etc/hosts.
Add these two records and set the ip address to 127.0.0.1 if you are running kubernetes locally, alternatively if you are running kube on a separate machine you can use that machines ip address.
Note
If you are hosting kube on a separate machine you will need to add that machines ip address to the cluster.yaml file located in deployment/k3d/cluster.yaml
In here look for the section starting with:
And add another entry like:Environment File
Edit the .env file in the root of the project and update the values
Set your NAMESPACE to a value such as <YOUR FIRST NAME>-dev you must make sure that the same value is set in the projects you are working on.
Set your GHCR_DOCKER_TOKEN to your GitHub personal access token, this is required to allow kubernetes to pull down docker images from private repositories.
Warning
You must set the same value for NAMESPACE in all projects in order for applications to be deployed into the same namespace.
Create your cluster
To create your cluster run:
Note
You can later run task k3d:stop to stop the cluster and task k3d:start to bring it back up without loosing your state, if you want to rebuild your cluster you can run task k3d:delete and then repeat the steps outlined in this step to re-create your cluster.
Once the above task has completed you should use lens or kubectl in order to first verify your server is up and running before continuing to the next step.
Info
Lens provide a free developer licence once you sign up.
When you open Lens you will see an icon at the top left of the app:
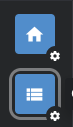
Click on the catalogue icon (highlighted) and you should see a list of available servers that you can connect to, find the one called k3d-dev-1 and click on the little pin to add it to your hot bar. You can now click on that icon to begin browsing your local server.
Try running the below commands if you are using kubectl:
kubectl get nodes

# should output
NAME                 STATUS   ROLES                  AGE     VERSION
k3d-dev-1-agent-0    Ready    <none>                 3h36m   v1.24.13+k3s1
k3d-dev-1-server-0   Ready    control-plane,master   3h36m   v1.24.13+k3s1

kubectl get pods -n kube-system

# should output
NAME                                      READY   STATUS    RESTARTS   AGE
coredns-74448699cf-7d8xb                  1/1     Running   0          3h37m
local-path-provisioner-597bc7dccd-vctm2   1/1     Running   0          3h37m
svclb-traefik-5ddc759c-wjk27              2/2     Running   0          3h37m
svclb-traefik-5ddc759c-mcwts              2/2     Running   0          3h37m
traefik-64b96ccbcd-mcnrm                  1/1     Running   0          3h37m
metrics-server-667586758d-2vv6x           1/1     Running   0          3h37m
Install Dependencies
Finally Run
to install Keydb, Mongo, Nats and the Verathread Gateway this will deploy the helm charts for you, you can later run task k3d:delete:charts to uninstall them if you wish.
You are good to go
Great you are now ready to switch to your project and start working, check the documentation in each project for instruction on how to get up and running.